
 Skip to content
StackSpot Plugins are a valuable resource in our platform. So in this blog post, we will see a step by step to create your first application plugin on StackSpot. Let’s dig in!
What is a StackSpot Plugin?
In a previous post, we introduced you to the idea of Plugins. If you haven’t read it yet, take a look before continuing. A Plugin on StackSpot is a mechanism where people can produce repetitive codes and make them available as scaffolds for the entire organization. The biggest advantage is to facilitate the adoption of standards and decrease the cognitive load of users.
Should I create a Plugin?
Think about it: Do you feel that you are repeating the same code structure in different tasks? Some examples can help you:
- Every time I’m going to create a new endpoint, I need to create a controller. Or a method with metadata indicating the HTTP verb, and another structure (which could be a class) representing the request data.
- For each new service that I create, I need to bring certain classes from another service. It’s not big enough to become a library.
- For each service that requires authentication and authorization, it’s necessary to carry out the whole configuration. Importing libraries, writing code, etc.
Each situation listed above can become an application Plugin. Again, with StackSpot you get speed, standardization, and cognitive load relief. It helps the developer focus on what changes from one scenario to another.
What level of parameterization should I allow in my Plugin? How to define this?
The level of parameterization depends on how restricted your context is. You may need a certain structure to always generate in the same way because of your company’s requirements.
But, you may need a Plugin to be a driver. In this case, you can parameterize it to allow the team to use it to define the values. It makes sense for the context while still following the company’s guidelines.
Now check the steps to create your first Plugin
Create your account in StackSpot
The first step in your journey “application plugin on StackSpot” is to create an account on StackSpot.
To create a personal account, you need to register with a valid Github account. Access the website and request to log in via GitHub.
Download STK CLI for your operating system
When you log in for the first time, a Welcome Screen appears and tells you a little about the product. The “Learn more” button takes you to the official documentation. If you are following the steps here, wait before clicking on it (finish this post first). Click on next and access the end of the welcome wizard.
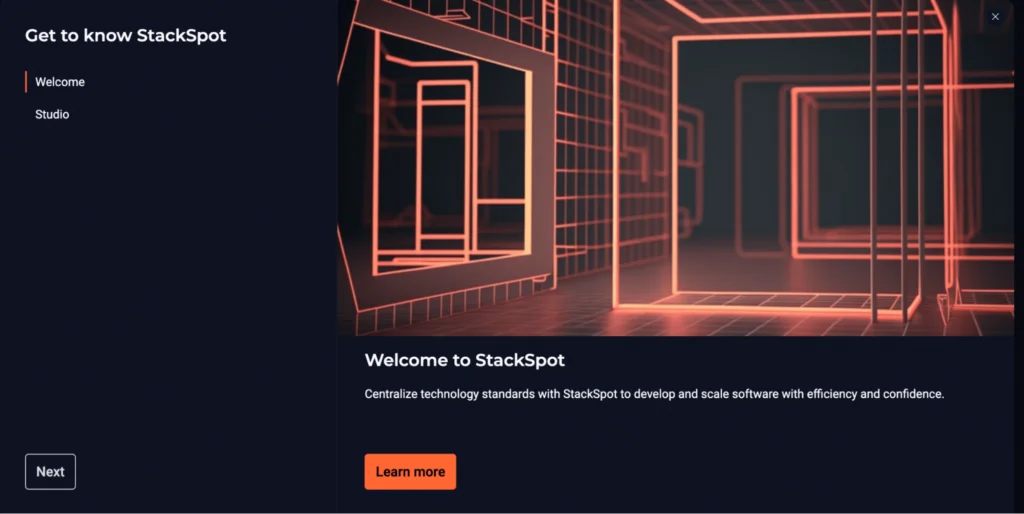
Now, after finishing the welcome wizard, you will access the logged-in area of StackSpot. It is similar to the following:

A part of creating on StackSpot is done through a Command Line Interface (CLI) our teams built. Now you need to download STK CLI, then we will proceed. To do this, click on the download link provided on the screen.
Install STK CLI
Installing STK CLI is a very straightforward process. You will click on the downloaded file and follow the wizard instructions. In the official documentation, you can see more details like the minimum version of GIT, etc.
Run the command in the terminal to create your first application plugin
Open your terminal and let’s do the basic test: Type stk –help. The output of the command should be like the following image:
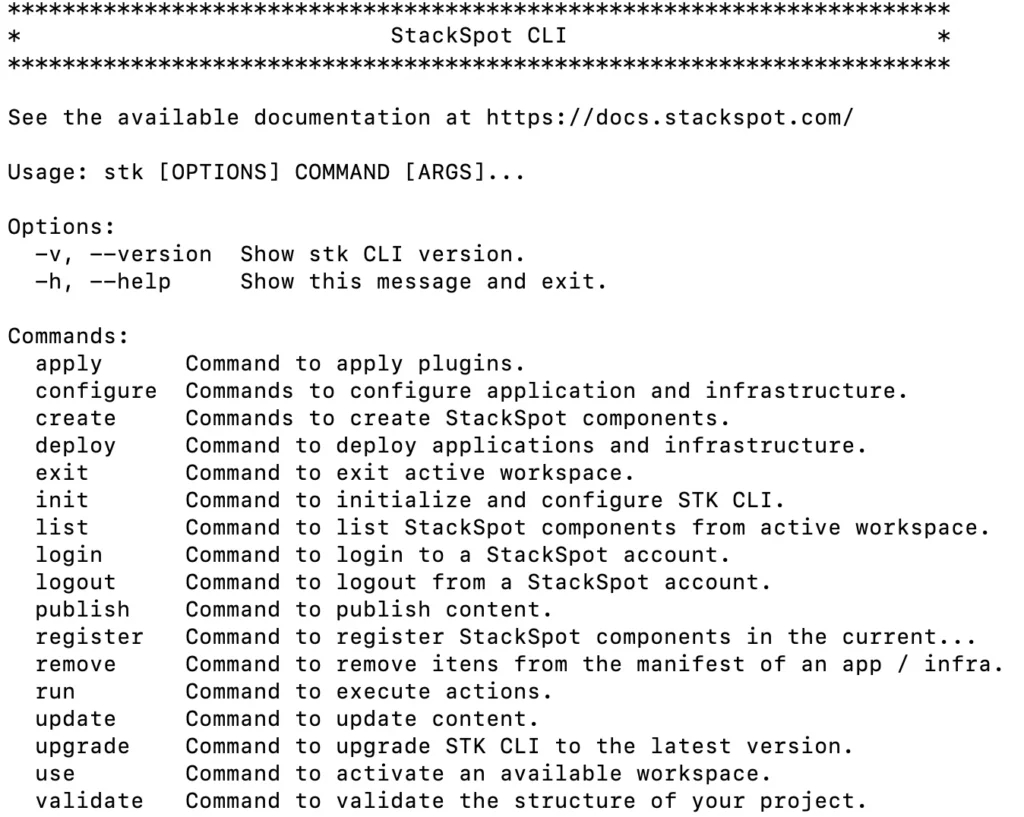
Notice that all the commands available on STK CLI were listed. Don’t worry about them now, let’s focus on what we want, which is to create and publish a new Plugin.
To reach our goal, we will use the create command. Let’s help again to find out what the possibilities are:
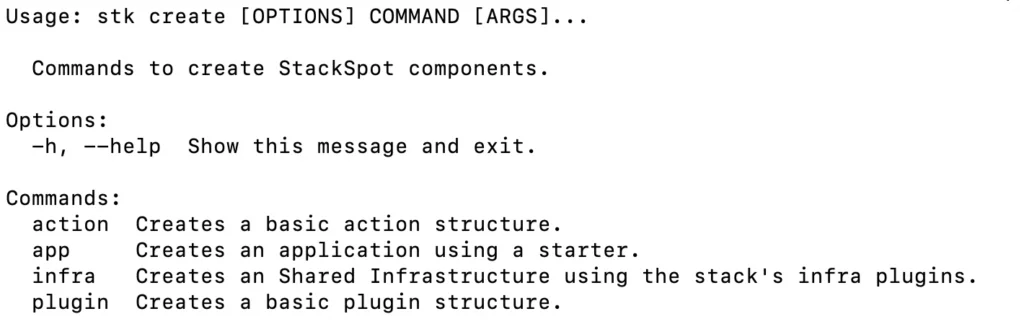
Again, we have some options. Let’s explore creating a plugin option. To do this, just run the command stk create plugin –help.
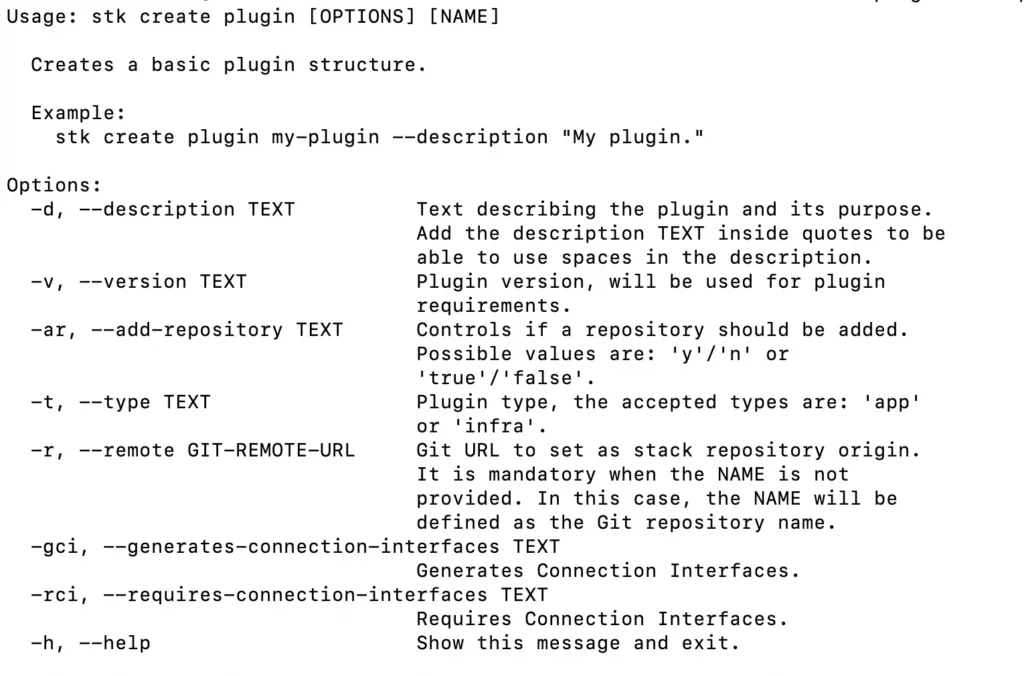
Here you can define some StackSpot parameters for our Plugin. At this moment we will work with the Plugin’s name and its description only.
Let’s create something very useful. A Plugin that helps configure a module of the Spring framework called Spring Data JPA.
The suggested command is: stk create plugin configure-spring-data-jpa –description “Plugin to generate the necessary configuration to work with Spring Data JPA”.
After creating the Plugin request, an option appears asking if the Plugin is for application or infrastructure. Select the “App” option.

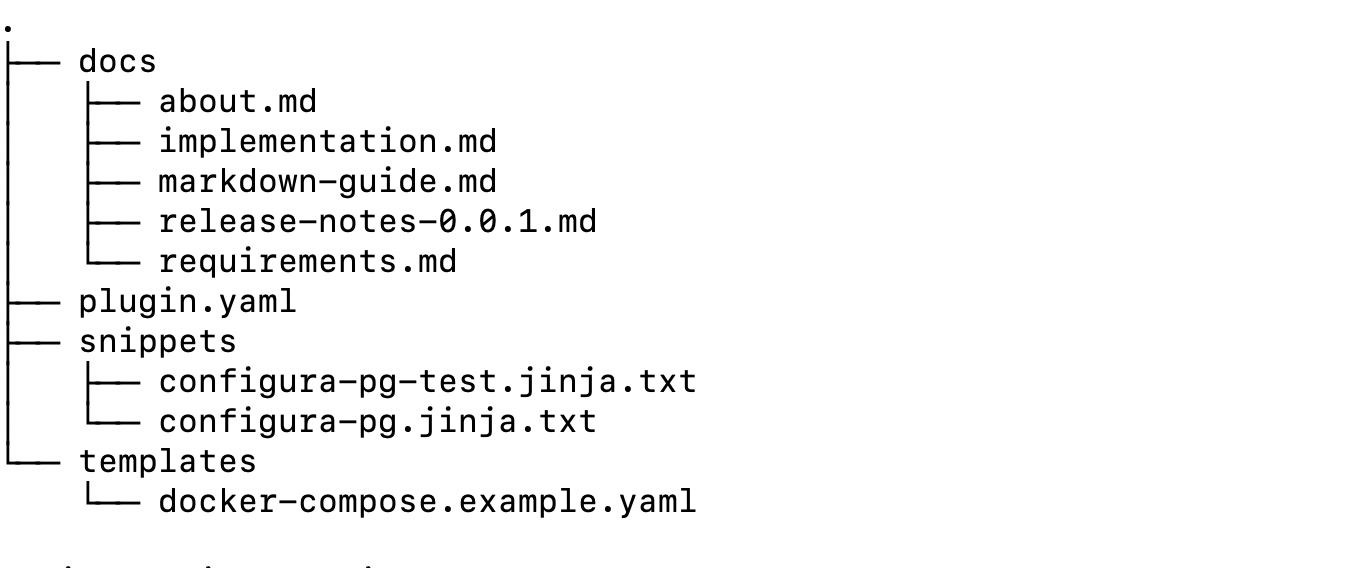
Analyzing the structure
You’ll notice that a new folder was generated with the Plugin name. Let’s quickly analyze the generated structure:
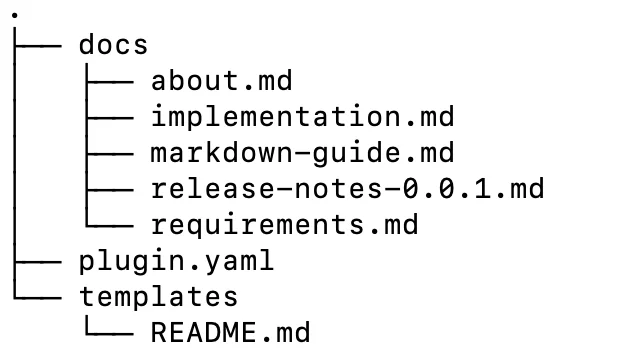
- The plugin.yaml file has the basic configurations of a Plugin. You find the explanation for each yaml property in the documentation about Plugins on StackSpot.
- The templates folder has files and folders it will make sense after applying the Plugin to a structure.
- The docs folder contains files related to the Plugin’s documentation. You will define use cases, the reason to exist, etc.
Implementing the plugin
Now let’s move on to the implementation. Creating a Plugin for a real-life situation needs some steps:
- Define the input parameters in the plugin.yaml file.
- Define the triggers. They will execute depending on what the user selects in the input parameters. These triggers are called Hooks in StackSpot.
- Create the files that will appear depending on the Hooks.
- Create the files that will appear inside the templates folder.
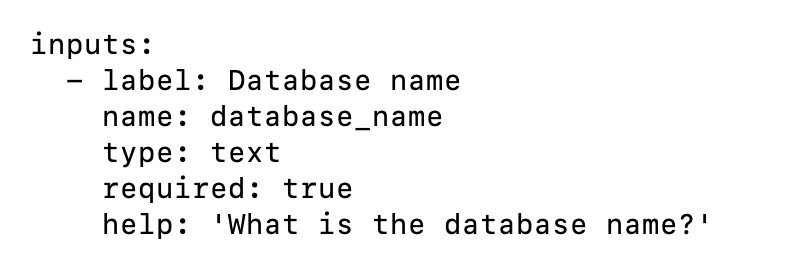
Define the input parameters in the plugin.yaml file
The Spring Data JPA configuration Plugin is related to the database. So it’s important to give the developer an option to choose the database the application will use. This is where standardization comes in, we’re going to simulate a company indicating the use of PostgreSQL as a database.
As we mentioned before, there are different levels of details for a Plugin. In this one, we’re going to pretend very restrictive guidance.
In the plugin.yaml file, we need to add the parameter that asks for the name of the database to be used by the application. For this, we’ll use the inputs property.
Define the triggers to execute based on what the user selects in the input parameters. These action triggers are Hooks on StackSpot.
Hooks are a powerful feature in Plugins. They are generally used when we need to edit some files already created in a project.
As we are working on a Spring Boot application that needs the Spring Data JPA configuration. There are other use cases for them, but let’s focus on what we need here.
Now take a look at some configured hooks:
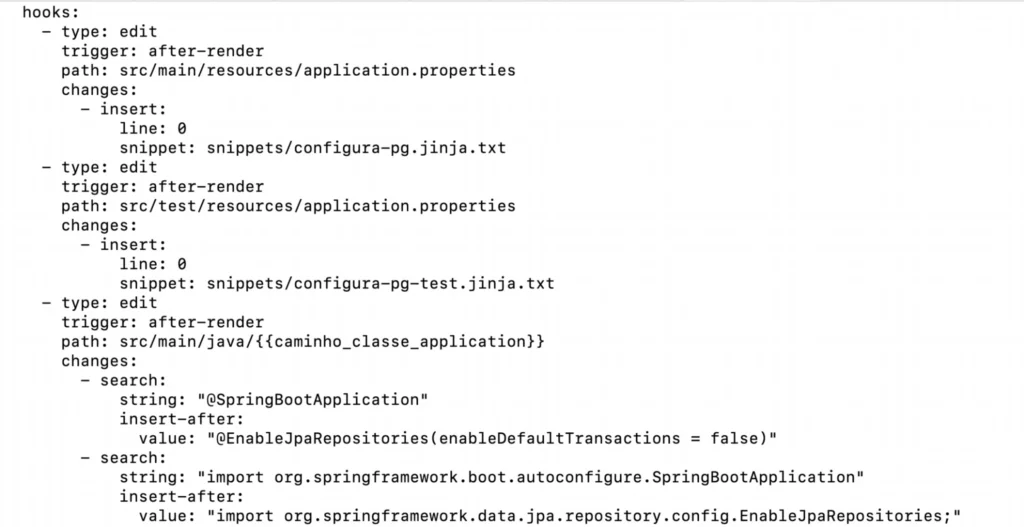
The first Hook configured is the ‘edit’ type. It will be executed immediately after the files in the templates folder appear. This is a very common option, as it allows us to edit even files that are materialized at that moment. The file that will be changed is the application.properties in the src/main/resources folder. The change is adding text on the first line of the file. The text is defined in the file in the snippets folder.
Now let’s check the content of the configura-pg-jinja.txt file:

The file has properties that define the access to the database. An interesting detail is the {{database_name}} code snippet. Here, we have the interpolation between the variable name defined for the input and the static content of the file.
STK CLI uses Jinja as the template engine. You need basic knowledge of this technology to interpolate the variables. There is a StackSpot documentation section dedicated to this.
We have another Hook of the same type, but it changes the application.properties file from the test folder, src/tests/resources. Along the same line, we have another hook. This one changes the application start file, adding a setting that disables transactions by default.
Now, to finish the changes, we need to add the necessary dependencies to the pom.xml file. This file is used when Java projects use Maven as a build tool.
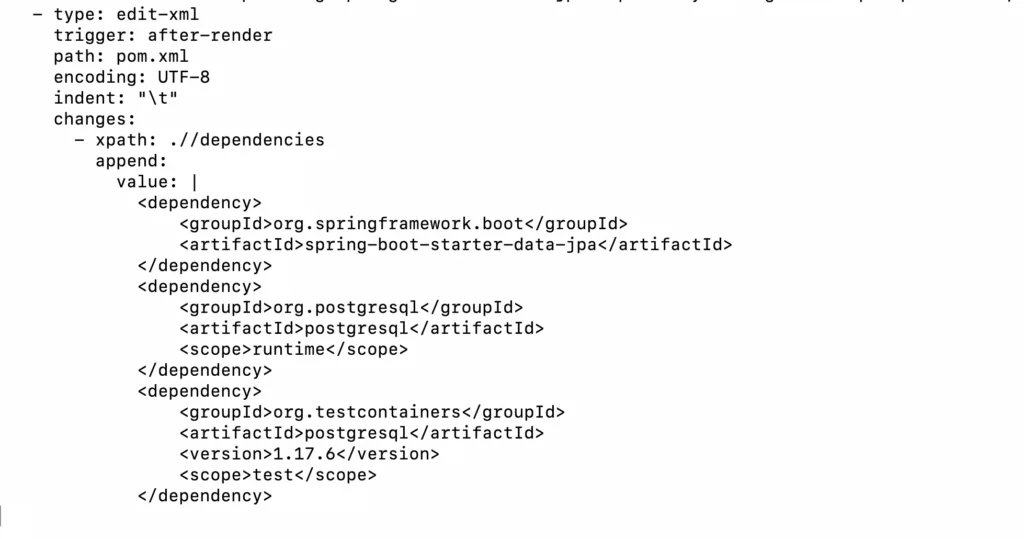
StackSpot offers special Hooks when you need to deal with XML, JSON, or YAML files. For a more assertive change, you can specify exactly what change needs to be made within the file. The type of hook is edit-xml.
To learn everything about Hooks, visit our official documentation.
Create the files that will be generated in the templates folder
Our Plugin will generate an example docker-compose file with already set-up database configuration instructions. This file can be used, or its code can be used and added to a docker-compose file already created in the project. When changing the original file can be complicated, this can be a tactic.
In the templates folder, we create the docker-compose-db.example.yaml file.
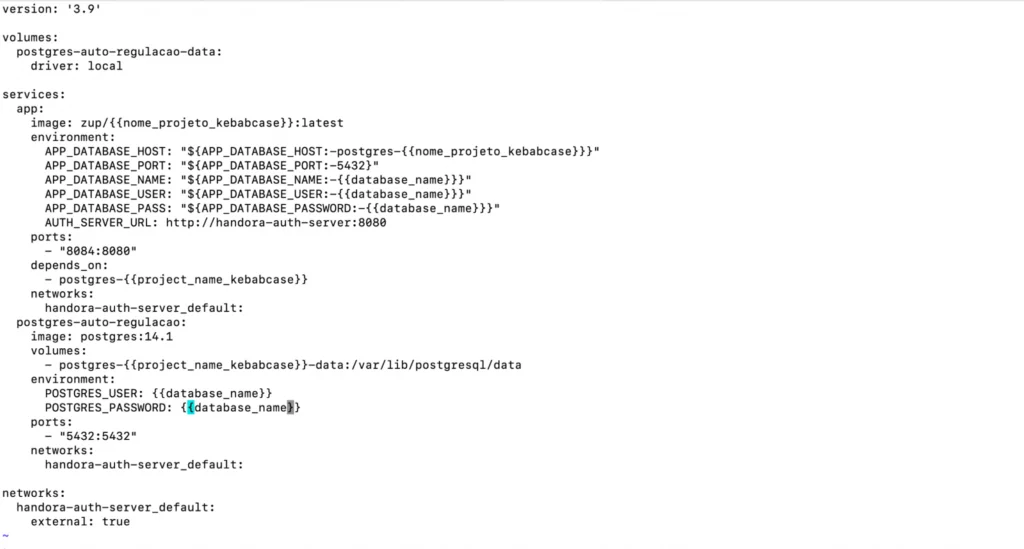
We are using the interpolation feature again. Now to reference the database name defined at the moment the Plugin is used.
The final structure of your Plugin should look something like this:
Check the complete code in this repository (link to the repo).
Validate locally
Now, validate the Plugin structure. Run the stk validate plugin in the folder of the plugin that we are creating.
Test the structure
Now the Plugin is created, let’s test its application. It requires the existence of a created Spring Boot project. For this, you can download the basic structure here(link) or generate a new one through the Spring Starter. That’s it, you can create a new Plugin to generate a project following a structure you find interesting.
Inside the project folder, run the following command: stk apply plugin pathToYourPlugin
Follow the Plugin application instruction, then check out the result!
What a journey!
Creating your first Plugin was quite a journey. We suggest you read the text again, to make the ideas clearer in your mind. We provided an example connected to real life, so you can start thinking about the possibilities to use Plugins applications.
Next chapters
After this step-by-step to create your first application plugin on StackSpot, we can explore many more scenarios. How do we make our Plugins available to our entire organization? Can we organize Plugins that deal with a particular technology? And direct them to specific teams?
Creating Plugins is one of the several StackSpot features. As the community discussed, the role of our engineering platform is to ease the work of teams working on features for products.
Post after post, we will show you that StackSpot has everything to be your ideal partner in this journey.
See you next time!
Unlock the speed and security of developing with StackSpot!
As experienced software engineers, we understand that you seek to provide efficient and standardized solutions that allow your team to focus on solving business problems, not on assembling the necessary infrastructure to tackle these issues. We recognize that time is precious and efficiency is vital. That’s why we’ve developed StackSpot, our Enterprise Developer Platform designed specifically for professionals like you.
How about a hands-on test of StackSpot, completely adapted to your company’s unique context and challenges? Our goal is to demonstrate how our platform can not only simplify the distribution of guidelines but also make their application easier, saving you time and boosting your team’s productivity.
Book a demo now! We’re eager to get to know you and your challenges. Let’s transform the landscape of your software engineering together with StackSpot.