
 Skip to content
StackSpot AI enhances the efficiency of development teams by harnessing artificial intelligence. This tool also facilitates the modernization of legacy mobile. Leveraging StackSpot AI for migration to Compose yields a 10x increase in agility.
This article provides a tutorial on how to modernize your projects.
Introduction to legacy mobile modernization
To use a simple explanation, Generative AI is a set of deep learning techniques and algorithms used to assemble Large Language Models (LLMs).
These models are exhaustively trained with a gigantic database and can generate content, interpret, and process information from multiple contexts, such as text, audio, music, video, and others.
Together with Natural Language Processing (NLP), LLMs are able to understand and interpret context —ranging from a request for tips on how to earn money passively to how to interpret functional codes in a given programming language and suggest improvements and good practices.
Several companies are offering products based on language models, such as OpenAI (ChatGPT), Google (Bard), Microsoft (Copilot) and Meta (LLaMa 2).
The image below shows where Generative AI fits within the many AI layers.

Artificial Intelligence
The outermost layer represents the discipline of Artificial Intelligence, which uses techniques and algorithms to simulate human behavior, allowing learning, decision making, pattern recognition, and complex problem solving, just like human intelligence.
Examples: Pattern Recognition, Computer Vision, Expert Systems.
Machine Learning
The Machine Learning discipline is a subset of the AI branch that is related to the use of advanced learning algorithms —in a supervised or unsupervised manner— to detect patterns in large databases, allowing intelligent systems to learn and adapt.
Deep Learning
On the third layer, Deep Learning —a subset of ML— utilizes neural networks for more intricate data processing and analysis. Several layers of neural networks communicate with each other, extracting high-level information based on data entries.
Generative AI
On the innermost layer is Generative AI, a subset of DL that employs models designed to generate content spanning texts, images, videos and even source codes.
This is possible because Gen AI models are trained with multiple data sources to discern patterns and yield results without requiring explicit instructions, using both supervised and unsupervised training.
What will you learn in this post?
Speaking of generating code, this article describes a practical case where Generative AI helps in routine software development tasks, exponentially and smartly increasing productivity based on your context.
To do that, we will use the StackSpot AI platform and its main components, such as Studio, Stack AI and Knowledge Source . When you finish reading this post, you will be able to:
- Understand the main components of the StackSpot AI platform;
- Understand the main advantages and limitations of using a smart Code Agent in routine software development tasks;
- Understand the concept and how to create Studios, Stacks AI, and Knowledge Sources;
- Set up the StackSpot AI plugin in Visual Studio Code;
- Design and execute assertive prompts for the migration process to Compose;
- Understand the benefits, challenges, and limitations associated with employing Generative AI and Prompt Engineering.
Mobile legacy: what is the cost of this technical liability?
A feature becomes legacy right when it starts production and will require maintenance —whether evolutionary or corrective. On mobile, specifically on Android, legacy is associated with several aspects, such as:
- Libraries with old versions;
- Deprecated APIs still in use;
- Code written in Java (Kotlin is the official programming language for Android development since 2017);
- Old patterns being used, such as Activity-only pattern, MVC (Model-View-Controller), MVP (Model-View-Presenter);
- Mechanisms that are asynchronous and not bound to lifecycle, such as Threads, AsyncTask, Executors;
- Obsolete View Bindings formats that use annotation processing, such as ButterKnife, AndroidAnnotations, etc.
These technical liabilities have costs and impact all journeys —from the developer to the end customer.
Slower builds
From a development perspective, dealing with legacy apps means making builds slower and more time-consuming, taking 20-30 minutes for each build, depending on the size of the project.
Customers are dissatisfied with the app experience
For users, the app may have performance issues, susceptibility to memory leaks and crashes in production, directly leading to customer dissatisfaction, prompting them to remove the app from their device or provide very low ratings in app stores.
No innovation
When an app has many old parts, it is difficult to innovate and offer a better experience to customers.
Because legacy has many limitations (e.g. a certain feature only works in a specific OS version), all new changes carry restrictions to avoid “breaking” what is already there.
Lower quality and test coverage
Having many old parts hurts the quality of the app and the product because unit tests are rarely upgraded to reflect the new or updated scenarios.
But removing the legacy is not a simple or quick task, as it involves several business and technical aspects, such as loss of the share of Daily Access Users (DAU) with the OS update, as well as update complexity, delivery time, coexistence with existing legacy, etc.
Often, the cost is so high (cost of development hours vs. complexity vs. delivery time) that the legacy is ultimately forgotten or not analyzed completely. Many companies decide to rewrite the application from scratch following the latest standards and leaving the legacy behind.
Migration strategy to Compose
Following Google’s suggestion, the steps to migrate to Compose can be seen in the image and animation below.

The image/animation above represents the layout hierarchy of an entire screen using Views and ViewGroups. Using a bottom-up approach, each child View or ViewGroup (containers and layouts) is migrated to Compose, going up until reaching the parent View (RootView).
Manual Migration: what are the main pain points?
Even though Google and the community have created excellent migration docs, this entire process is still quite costly, as it is executed manually and susceptible to multiple problems:
- Possible mapping errors between View and Composable attributes;
- Longer legacy modernization time, delaying time-to-market;
- Longer Composables backtests;
- Lack of standardization during the migration process;
- Too much time spent checking documentation to ensure the most assertive migration.
Assisted Migration by Code Assistant: what are the advantages?
In assisted migration, the Code Assistant generates ~80% of the functional code needed to run your software, according to prompts or Natural Language commands provided to the assistant.
What are the advantages of this approach? Several, including:
- Speed increased by as much as 10x in productivity and delivery of value to customers;
- Drastic reduction in legacy modernization time, with~80% of the code automatically generated by code assistants and 20% of the time or cognitive load saved for allocation to other contexts, such as improving the quality of the project and product;
- Rigorously standardized process adhering to good practices and major market standards;
- Less time spent checking documentation;
- Automated documentation generation.
This approach is becoming increasingly popular after platforms such as ChatGPT, Microsoft Copilot, Amazon CodeWhisperer, Studio Bot and lately StackSpot AI entered the daily routine of software developers, who are now sharing the leading role with these “chatbots with superpowers”.
How is StackSpot AI different from other Code Assistants?
In the “Game of Thrones” of Generative AI, StackSpot AI shows great promise thanks to its distinguished concepts like Stack AI and Knowledge Sources.
Both make code generation more contextualized in terms of business rules, core business, platform, standards and much more, delivering highly credible codes that align with developers’ workflows.
Compose AI: Migrating from Views to Compose 10x faster!
To explore the full potential of the platform, the case focuses on creating an XML to Kotlin converter, more specifically for Jetpack Compose. To build this converter, the following steps will be executed:
- Convert XML to Kotlin (Compose);
- Add ViewModel —no prior knowledge of StackSpot required because essential concepts will be explained during the creation of the converter. If you wish to delve deeper into the platform, read the Docs and other captivating articles on the StackSpot blog.
Setup
Become familiar with the StackSpot AI platform
The StackSpot platform is subdivided into several parts, such as StackSpot Enterprise Development Platform (EDP) and StackSpot AI.
The latter is StackSpot’s latest initiative to integrate Generative AI into the development context, offering a fully customized and hyper-contextualized Dev Experience.
First, let’s check out the StackSpot AI portal. Access the StackSpot AI platform portal at ai.stackspot then click on Login for authentication on the platform.
At the time this post is being written, the platform is in its Beta version and available for people around the world to explore its potential.

After authentication on the platform, you will reach the platform’s main page, as in the image below.

Creating a Studio
According to StackSpot Docs, a Studio is where your content is created in StackSpot —basically a global repository where Stacks are linked.
It is possible, for example, to have a Studio that involves stacks and plugins for a certain language (e.g. Java, Kotlin, Python), which will be applied according to a specific context.
To create a Studio, point to the Studios section on the menu on the left or click on the orange button on the top right corner and then on Studio.

Fill in Studio information like Name, Slug (public URL for your Studio)
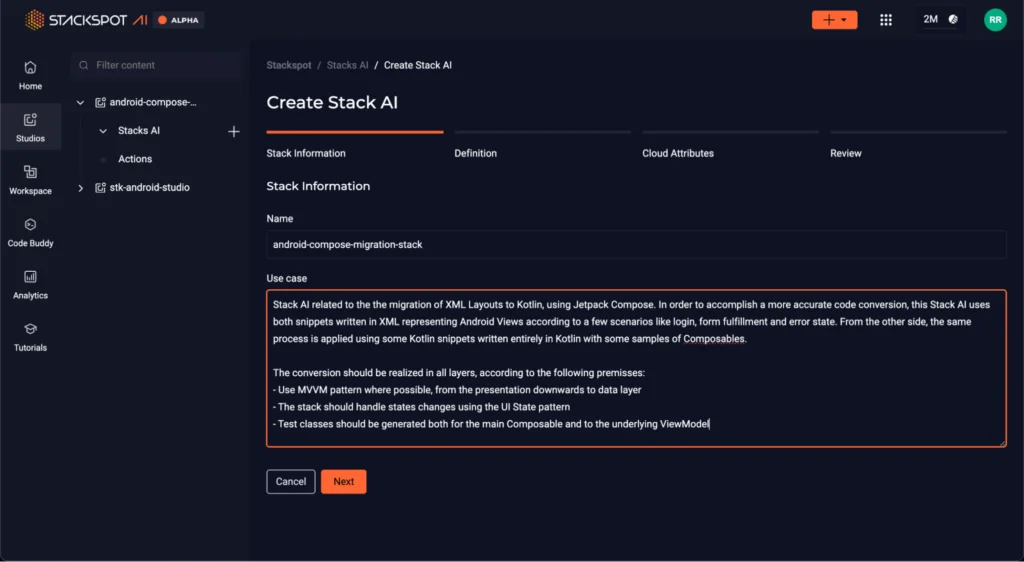
Creating a Stack AI
A Stack AI is an abstraction conceived to bring more contextualization and generate responses or codes that are more accurate and true to the context in which you are immersed.
Information such as description, patterns (e.g., MVVM, Clean Architecture, SOLID), cloud attributes (e.g., S3, EC2, EKS, etc.), frameworks, and dependencies will be utilized so that the code assistant will “remember” when a prompt is received.
To create a Stack AI, follow the same steps you took to create a Studio, but choose Stack AI this time. At that moment, a modal screen will open to capture your information, such as description and name.
Creating Knowledge Sources
Knowledge Sources are static or dynamic and used to bring more context to the StackAI engine, so it can interpret, infer, and understand how to perform a certain action (for example, how to convert XML codes to Kotlin in the format accepted by Compose).
In its Beta version, the StackSpot AI platform currently offers two types of Knowledge Sources:
- API: JSON files in swagger format with all protocols that should be used as basis for Stack AI. Ex: Bankly, an open source API that has several core banking functionalities and generates bank payment slips.
- Snippets Groups: sets of code snippets that will be used to provide more context for the platform engine to interpret, infer, and understand how to generate XML and Kotlin codes in the format expected by Compose.
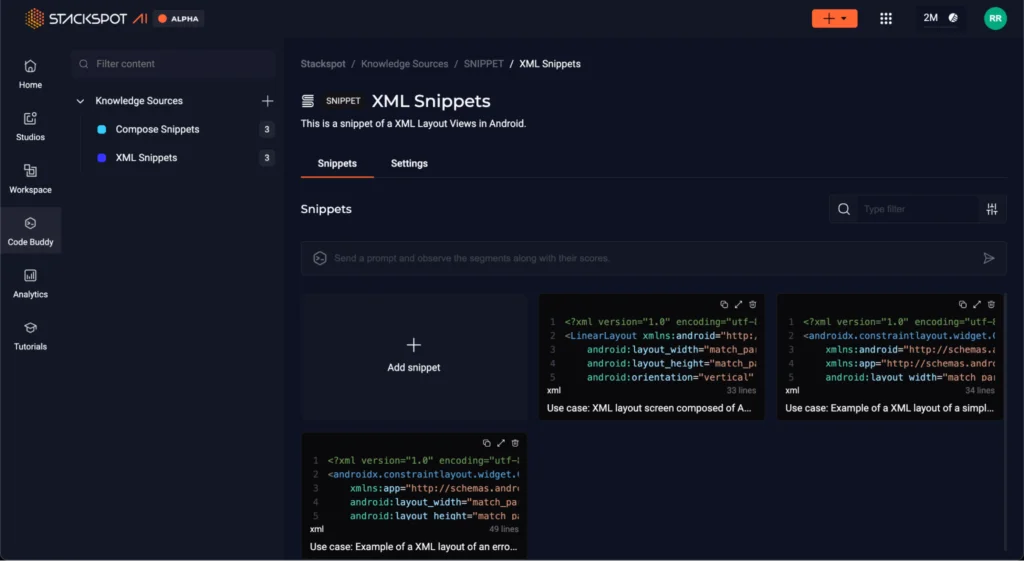
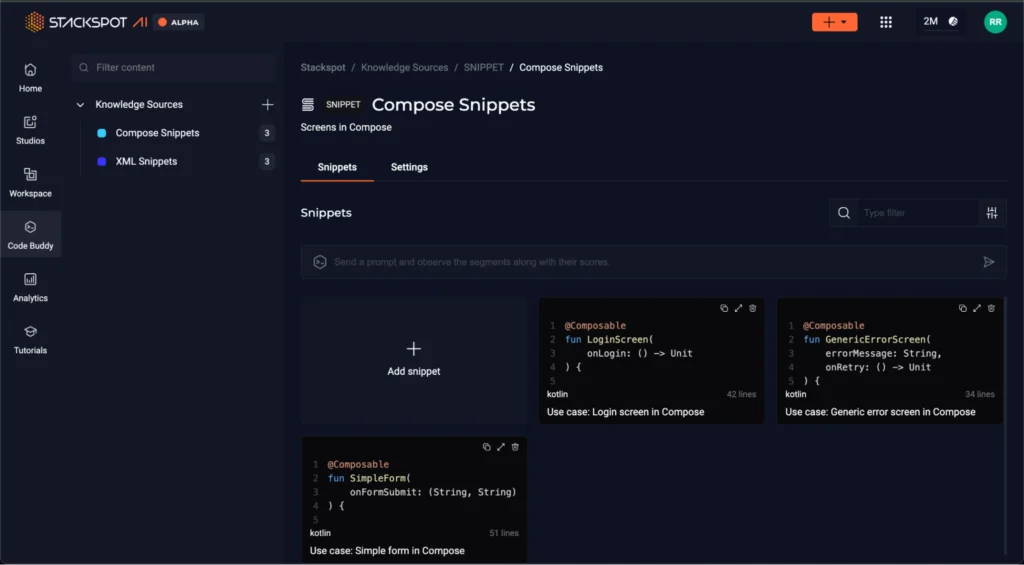
Adding Knowledge Sources
In this particular case, we will add two Snippet Groups: one containing three XML code examples of View layouts in the following scenarios: Login screen, simple form, and a generic error screen. Likewise, the other snippet will be made up of three snippets in Kotlin using Composables in these same scenarios. So, to add Snippets Groups:
- Click on the “StackSpot AI” item on the menu on the left;
- Click on the “+” sign on the right side of the Knowledge Sources area;
- Click on Snippets Groups;
- Click on Add snippet and add code examples to each snippet.
Ready! Now the knowledge source base is set up. In the next section, we will practice Prompt Engineering to generate contextualized code.

Developing with StackSpot AI
Plugin settings
Now, it’s time to implement! One great advantage of StackSpot AI is integration with existing IDEs.
To “talk” to StackSpot AI, we need to download and install the plugin, which right now is only available for VS Code, but already planned for IntelliJ IDEA.
This plugin allows the user to interact with the smart agent via prompts and perform various actions, or Quick Commands, such as generating test classes for the code in question, refactoring classes, and other features.
To continue setup, follow the instructions in StackSpot AI QuickStart for a step-by-step explanation on how to download, install, and set up StackSpot AI in VS Code.
Linking the plugin to the workspace and stack
After installation, you must log into your StackSpot AI account by following one of these paths: use your email and password or your own GitHub account (by clicking on “Sign in with GitHub”). You can start interacting with StackSpot AI after authentication.
Next, you will see the StackSpot AI welcome screen. Choose mobile-code-migrations-ws and android-compose-migration-stack in Workspace and Stack AI, respectively. Then you can start “talking” to the StackSpot code agent.
Applying Prompt Engineering
From now on, we can write prompts for the smart assistant to generate codes. The development flow will use the MVVM (Model-View-ViewModel) architecture.
For teaching purposes and validation on the presentation layer, we will not generate code for layers below, such as Repository, Data Sources or Use Cases, but you can do this as part of your homework.
Step 1: Generating Composables from Views
Prompt
Convert these Views to Composables
Code assistant response:
@Composable
fun LoginScreen() {
    var email by remember { mutableStateOf("") }
    var password by remember { mutableStateOf("") }
    var rememberMe by remember { mutableStateOf(true) }

    Column(
        …
    ) {
        Image(
            painter = painterResource(id = R.mipmap.ic_launcher),
            contentDescription = null // Provide a proper content description for accessibility
        )
        Spacer(modifier = Modifier.height(16.dp))
        OutlinedTextField(
            …
            keyboardOptions = KeyboardOptions(keyboardType = KeyboardType.Email)
        )
        Spacer(modifier = Modifier.height(8.dp))
        OutlinedTextField(
            …
            visualTransformation = PasswordVisualTransformation()
        )
        Spacer(modifier = Modifier.height(16.dp))
        Row(
            modifier = Modifier.fillMaxWidth(),
            verticalAlignment = Alignment.CenterVertically
        ) {
            Checkbox(
                checked = rememberMe,
                onCheckedChange = { rememberMe = it }
            )
            Text(
                text = "Remember Me",
                modifier = Modifier.padding(start = 8.dp)
            )
            Spacer(modifier = Modifier.weight(1f))
            Text(
                text = "Forgot Password?",
                modifier = Modifier.clickable { /* Handle forgot password */ }
            )
        }
        Spacer(modifier = Modifier.height(10.dp))
        Button(
            onClick = { /* Handle login */ },
            modifier = Modifier
                .fillMaxWidth()
                .padding(bottom = 10.dp)
        ) {
            Text("Log In")
        }
        Button(
            onClick = { /* Handle sign up */ },
            modifier = Modifier
                .fillMaxWidth()
                .padding(bottom = 10.dp)
        ) {
            Text("Sign Up")
        }
    }
}
Response analysis
Importantly, even though the terms “XML” and “Compose” were not mentioned, the StackSpot AI engine was able to infer properly when converting to Composables.
An example of this was the use of Column and Row to represent components arranged vertically or horizontally, respectively. Another example is Spacer, which was added to represent spacing added to Views such as marginTop, marginBottom or marginHorizontal.
The comparative table below shows settings of equivalent Views and Composables after conversion.
| View | Composable | Description |
| <LinearLayout orientation=”vertical” /> | Column | Arranges components vertically or in column format |
| <LinearLayout orientation=”horizontal” /> | Row | Arranges components horizontally or in line format |
| <ImageView /> | Image | Views an image (drawables) on the screen |
| <EditText /> | OutlinedTextField | Represents a text field |
| <CheckBox /> | Checkbox | Represents a checkbox |
| <Button /> | Button | Represents a button |
| Spacing(internal and external) | Spacer | Spacer represents the visual container for spacing |
| Spacing(content) | Modifier | Component that applies changes to Composable, such as spacing, content adjustment, alignment, etc. |
Remarkably, the engine also adds contextual information regarding the Compose architecture, such as the remember and mutableStateOf() operators, which are Compose operators related to state management.
Before copying and pasting, you will notice that when copying and pasting the generated Composable code, an error is displayed when OutlinedTextField is called.
The reason behind this is that this Composable —like TextField— is an experimental API in Compose’s Material 3 lib. To remove it, simply add the @ExperimentalMaterial3Api annotation to the Composable LoginScreen.
@Composable
@ExperimentalMaterial3Api
fun LoginScreen() {
  // Outros composables vão aqui
}
Step 2: Preview Generation for LoginScreen
Prompt
“Now generate a Preview for the main composable.”
Result generated by the code assistant:
@Composable
fun LoginScreen() {
    // ... (o código do LoginScreen vai aqui)
}

@Preview(showBackground = true)
@Composable
fun LoginScreenPreview() {
    // Aqui você pode definir um tema, se estiver usando um, ou simplesmente chamar o LoginScreen diretamente.
    // Se você estiver usando um tema, substitua 'Theme' pelo nome do seu tema.
    // Theme {
    //     LoginScreen()
    // }

    LoginScreen()
}
Response analysis
At this point, StackSpot AI identified the main composable —LoginScreen— and applied the @Preview annotation so that the Composable can be previewed in the Android Studio.
Preview Composable in Android Studio
Now we will validate whether the generated code is functional. To do this, we will run the generated composable to Preview.
At the time this article is being written, VS Code has yet to support Compose development. Therefore, we must use Android Studio. Download and install it or open it if you have already installed it.
Create a new project as usual through File → New → New Project… The screen will start with the Empty Activity item selected. Leave it as it is because this template comes with Compose support. Finish project creation and wait for the build process to end.
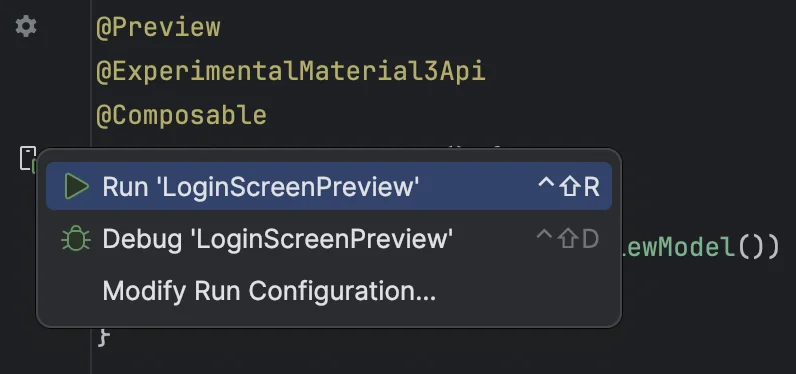
Once this is done, create a new Kotlin class through New → Kotlin Class/File → Name it “LoginScreen” and save. Navigate to Preview, click on the Play button next to it and select “Run LoginScreenPreview”. The app will be loaded on the emulator or physical device, as shown in the image below.

As you can see, the code agent generated functional code, where Composables are viewed on the screen in a matter of seconds! Manually, this process would take much longer.
Of course, the code is not yet 100% complete. We still need actions to log in and validate credentials, which we will do in the next step using a ViewModel.
Troubleshooting devices running Oreo (Android 12)
If you are running the preview on a device or emulator with Android 12 or higher, the app will probably break when running, displaying the following error: java.lang.IllegalArgumentException: Only VectorDrawables and rasterized asset types are supported ex. PNG, JPG.
This situation happens because, at the time this article is being written, Compose has yet to support Adaptive Icons. A workaround for this can be viewed on this link. Another alternative is to update the Image to use PNG, JPG or WebP.
Step 3: ViewModel Generation
Prompt
“Now add a ViewModel with valid and error credential validation logics. A credential will be valid if the email field equals {your_email} and password equals {your_password}. Otherwise, it will be considered an error scenario. “
Result generated by the code assistant:
class LoginUiState(
    val email: String = "",
    val password: String = "",
    val isValidCredentials: Boolean? = null
)
lass LoginViewModel : ViewModel() {
    // Define the UI state with LiveData/State API/Flow
    var uiState by mutableStateOf(LoginUiState())
        private set

    // Constants for valid credentials (switch to your correct values)
    private val validEmail = "{seu_email}"
    private val validPassword = "{sua_senha}"

    // Validates credentials
    fun validateCredentials(email: String, password: String) {
        if (email == validEmail && password == validPassword) {
            // Credenciais válidas
            uiState = uiState.copy(isError = false, isSuccess = true)
        } else {
            // Credenciais inválidas
            uiState = uiState.copy(isError = true, isSuccess = false)
        }
    }
}
LoginScreen + LoginViewModel.kt
@Composable
fun LoginScreen(viewModel: LoginViewModel = viewModel()) {
  val uiState by viewModel.uiState.collectAsState()

    Column(
        modifier = Modifier
            .fillMaxSize()
            .padding(horizontal = 16.dp),
        horizontalAlignment = Alignment.CenterHorizontally
    ) {
        // ... outros composables ...

        Button(
            onClick = { viewModel.validateCredentials(uiState.email, uiState.password) },
            modifier = Modifier
                .fillMaxWidth()
                .padding(bottom = 10.dp)
        ) {
            Text("Log In")
        }

        // Exibir mensagem de erro se as credenciais forem inválidas
        if (uiState.isValidCredentials == false) {
            Text("Credenciais inválidas", color = Color.Red)
        }
    }
}
Response analysis
During the creation of the Stack AI, one information was to use MVVM as one of the patterns. So, the code assistant “remembered” that the ViewModel is part of the presentation pattern and generated not only the code itself, but separated the information in LoginUiState and a flag to indicate whether credentials are valid.
Furthermore, the smart code agent updated the main Composable to reference uiState exposed in the ViewModel, being able to call the collectAsState() method to notice changes in the states of the fields encapsulated by the LoginUiState class.
It is worth mentioning that the code agent updated the main Composable to receive a ViewModel as a parameter and also linked the call to the ViewModel’s validateCredentials()method, according to the excerpt below:
@Composable
fun LoginScreen(viewModel: LoginViewModel = viewModel()) {
  val uiState by viewModel.uiState.collectAsState()
  // trecho de outros composables vem aqui

  Button(
           onClick = {
                viewModel.validateCredentials(uiState.email, uiState.password)
           },
            modifier = Modifier
                .fillMaxWidth()
                .padding(bottom = 10.dp)
        ) {
            Text("Log In")
        }

    // Exibir mensagem de erro se as credenciais forem inválidas
        if (uiState.errorMessage != null) {
            Text("Credenciais inválidas", color = Color.Red)
        } else {
      Text("Credenciais válidas", color = Color.Green)
    }
}
Important tip
When executing the first prompt, the engine generated an implementation for the ViewModel based on LiveData (component that notifies the UI about state changes).
This approach is not wrong but is no longer Google’s official recommendation. Google suggests using Flow, a Kotlin Coroutines engine more suitable for managing data flows or streams.
Therefore, if this happens, simply redo the prompt by asking the code agent to generate the ViewModel using Flow.
Running Preview to validate credentials
Update the LoginScreen code and create a new Kotlin class for LoginViewModel, like in the previous step. To simulate a scenario that is closer to reality, let’s change the attributes referring to the email and password to “me@stackspot.com” and “123456”, respectively. It’s your choice to use any value for these attributes.
After that, just navigate to LoginScreenPreview and click on the Play button to run the app on the emulator or device. When the expected credentials are entered, the message “Valid credentials” is displayed. Otherwise, the message “Invalid credentials” is displayed, as in the images below.
Step 4: Refactoring LoginUiState to represent Authentication, Success and Error states
Prompt
Now update LoginUiState to use the following states: Authentication, Success, and Error.
Result generated by the code assistant:
LoginUiState.kt
sealed class LoginUiState {
    object Authenticating : LoginUiState()
    object Success : LoginUiState()
    data class Error(val message: String) : LoginUiState()
    data class Data(
      val email: String = "",
    val password: String = "",
    val isRememberMeChecked: Boolean = false
  ) : LoginUiState()
}
LoginViewModel.kt
class LoginViewModel : ViewModel() {
    // MutableStateFlow para manter e emitir mudanças no estado da UI
    private val _uiState = MutableStateFlow<LoginUiState>(LoginUiState.Data())
    // StateFlow para expor apenas uma versão imutável do estado da UI
    val uiState: StateFlow<LoginUiState> = _uiState

    // Função para atualizar o email
    fun updateEmail(email: String) {
        val currentState = _uiState.value as? LoginUiState.Data
        currentState?.let {
            _uiState.value = it.copy(email = email)
        }
    }

    // Função para atualizar a senha
    fun updatePassword(password: String) {
        val currentState = _uiState.value as? LoginUiState.Data
        currentState?.let {
            _uiState.value = it.copy(password = password)
        }
    }

    // Função para atualizar o estado do checkbox "Lembrar-me"
    fun updateRememberMe(isChecked: Boolean) {
        val currentState = _uiState.value as? LoginUiState.Data
        currentState?.let {
            _uiState.value = it.copy(isRememberMeChecked = isChecked)
        }
    }

    // Função para iniciar o processo de autenticação
    fun onLoginClicked() {
        viewModelScope.launch {
            // Atualiza o estado da UI para autenticando
            _uiState.value = LoginUiState.Authenticating

            try {
                // Aqui você colocaria a lógica de autenticação
                // Por exemplo, chamar um repositório que faz a autenticação
                val result = authenticateUser()

                // Atualiza o estado da UI para sucesso ou erro com base no resultado
                _uiState.value = if (result) LoginUiState.Success else LoginUiState.Error("Falha na autenticação")
            } catch (e: Exception) {
                // Atualiza o estado da UI para erro com a mensagem de exceção
                _uiState.value = LoginUiState.Error(e.message ?: "Invalid Credentials")
            }
        }
    }

    suspend fun onLoginClicked(): Boolean {
        // Simula uma chamada de rede ou de banco de dados
        // Aqui você implementaria a lógica de autenticação real
        return true // Retorna true para simular um sucesso na autenticação
    }
}
Complementing the code manually
Notice that the onLoginClicked() method was generated without login and password parameters or function to validate credentials because there was no such information in the prompt. Don’t forget to change the login button’s call to onClick to call viewModel.onLoginClicked(dataState.email, dataState.password).
Then, the function for validating credentials will be implemented again. Finally, let’s add a call to the delay() method lasting two seconds to simulate a call to the authentication API.
And the final code looks like this:
class LoginViewModel : ViewModel() {
    private val _uiState = MutableStateFlow<LoginUiState>(LoginUiState.Data())
    val uiState: StateFlow<LoginUiState> = _uiState

companion object {
    const val VALID_EMAIL = "me@stackspot.com"
    const val VALID_PASSWORD = "123456"
    const val MOCK_DELAY = 2_000L
}

// outros métodos omitidos aqui
                                                                                                                                                                                                                       fun onLoginClicked(email: String, password: String) {
        // Simulate authentication process
        _uiState.value = LoginUiState.Authenticating
        viewModelScope.launch {
            delay(MOCK_DELAY)
            _uiState.value =
                if (hasValidCredentials()){
                   LoginUiState.Success
                } else {
                    LoginUiState.Error("Invalid credentials")
                }
        }
    }
}

fun hasValidCredentials() =
    VALID_EMAIL == email && VALID_PASSWORD == password
LoginScreen.kt
@Composable
@ExperimentalMaterial3Api
fun LoginScreen(viewModel: LoginViewModel = viewModel()) {
    val uiState by viewModel.uiState.collectAsState()

    Column(
        modifier = Modifier
            .fillMaxSize()
            .padding(16.dp),
        horizontalAlignment = Alignment.CenterHorizontally,
        verticalArrangement = Arrangement.Center
    ) {
        when (uiState) {
            is LoginUiState.Data -> {
                val dataState = uiState as LoginUiState.Data
                TextField(
                    value = dataState.email,
                    onValueChange = { viewModel.onEmailChanged(it) },
                    label = { Text("Email") },
                    modifier = Modifier.fillMaxWidth()
                )
                Spacer(modifier = Modifier.height(8.dp))
                TextField(
                    value = dataState.password,
                    onValueChange = { viewModel.onPasswordChanged(it) },
                    label = { Text("Password") },
                    modifier = Modifier.fillMaxWidth()
                )
                Spacer(modifier = Modifier.height(8.dp))
                Row(
                    modifier = Modifier.fillMaxWidth(),
                    verticalAlignment = Alignment.CenterVertically
                ) {
                    Checkbox(
                        checked = dataState.isRememberMeChecked,
                        onCheckedChange = { viewModel.onRememberMeChecked(it) }
                    )
                    Text(text = "Remember Me")
                }
                Spacer(modifier = Modifier.height(16.dp))
                Button(
                    onClick = { loginViewModel.onLoginClicked(dataState.email, dataState.password) },
                    modifier = Modifier.fillMaxWidth()
                ) {
                    Text("Login")
                }
            }
            LoginUiState.Authenticating -> {
                Row(
         modifier = Modifier.fillMaxWidth(),
                    verticalAlignment = Alignment.CenterVertically
       ) {
         Text("Authenticating...")
         Spacer(modifier = Modifier.padding(16.dp))
           CircularProgressIndicator()
       }

            }
            is LoginUiState.Success -> {
                Text("Login Successful", Color.Green)
            }
            is LoginUiState.Error -> {
                Text((uiState as LoginUiState.Error).message, Color.Red)
            }
        }
    }
Response analysis
In the excerpt above, the ViewModel was not linked to the main Activity because we only used Preview until then. Now, the MainActivity class must call the Composable LoginScreen.
Step 5: Call LoginScreen in the Activity context.
Prompt
Call the main composable inside the MainActivity
Result generated by the code assistant:
@ExperimentalMaterial3Api
class MainActivity : ComponentActivity() {
   override fun onCreate(savedInstanceState: Bundle?) {
       super.onCreate(savedInstanceState)
       setContent {
           ComposeAITheme {
               LoginScreen(viewModel = viewModel())
           }
       }
   }
}
Response analysis
The setContent method was added and the call was made to the Compose context —in this case the LoginScreen that uses the ComposeAITheme generated by Android Studio automatically after the project was created.
MainActivity class is calling the composable, thus you will notice the same error related to the Material 3 Experimental API. Following the procedure done previously, just add the @ExperimentalMaterial3Api annotation to the MainActivity class.
Running the app on the emulator or physical device
Now that we’ve completed the implementation, let’s run the app in Android Studio to ensure that both the visual interface and behavior comply with business rules.
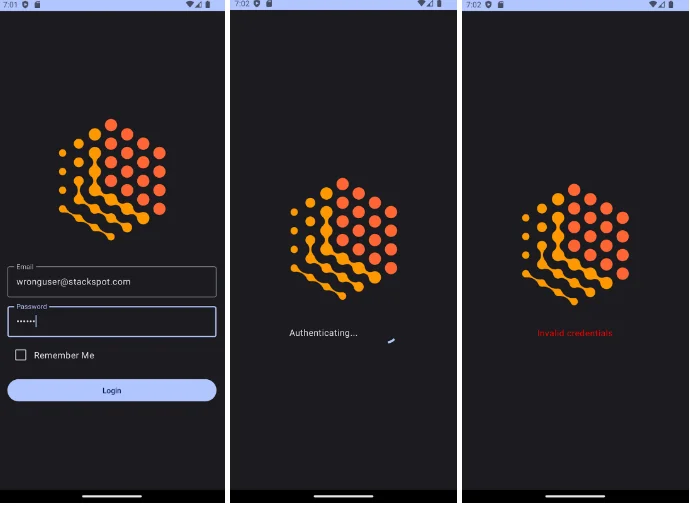
Click the button that runs the application. If you don’t have any physical device available, use the emulator. The images below show the app in the scenarios of valid credentials and invalid credentials.
Scenario 1: Valid credentials

Scenario 1: Invalid credentials
Highlights
- Very assertive code conversion: every time code conversion was used, results were more than 80% assertive, and even added more features to the target code (e.g. PasswordVisualTransformation in the password field).
- Codes generated without syntax errors: the generated codes did not present any syntax errors, although it was necessary to add the @ExperimentalMaterial3Api annotation for the code to be functional due to the Compose version and feature.
- Standards and good practices are respected: when creating the Stack AI for this example, MVVM, Clean Architecture and SOLID were informed as Patterns to be used. When code was generated, StackSpot AI’s code assistant “remembered” these patterns.
- Quick response to prompts: in most cases, simple prompts yielded results in under 10 seconds, while more intricate prompts required no more than 30 seconds.
- Productivity gains: the speed of StackSpot AI enables unprecedented gains in productivity. Tasks that once demanded days for completion can now be accomplished in a matter of seconds!
- Friendly interface: both the portal and the plugin have very friendly interfaces, making the Dev Experience much better and more productive.
Challenges and limitations
While implementing this example, we faced challenges primarily associated with LLMs rather than the StackSpot AI platform:
- Define a more assertive prompt: the big challenge in the context of Generative AI is to use a prompt to achieve a result that is closer to expectations. But to do this, you need to find the best prompt possible. How do we accomplish this? By doing many experiments until we find what makes sense for the business.
- Loss of context between prompts: sometimes the code assistant updated the code, but “forgot” parameters that had already been generated, requiring an additional prompt for correction. e.g. updating the LoginViewModel when LoginUiState was updated to handle states.
- Using two IDEs: using VS Code to generate the prompts and Android Studio to preview and run the app was not strenuous, but required copying from one IDE, pasting and running it in the other, organizing imports, etc. Currently, the StackSpot AI plugin is not fully compatible with Android Studio because the IDE —which is based on IntelliJ— was designed with a shortened version of the platform, only supporting up to version 2022.* However, there is a workaround to make the plugin work in Android Studio, but the details of this adjustment fall beyond the purview of this article.
- Loss of history: sometimes when returning to VS Code, it was necessary to log in again and run all the prompts, often generating completely different results because the history of prompts and responses are not stored.
Conclusion
This article illustrated the advantages of leveraging Generative AI to expedite and systematize the modernization of legacy mobile with increased productivity, speed and hyper-contextualization using StackSpot AI.
For this, a login screen was used as example, generating Composables from the XML views, following the MVVM and UI State Pattern, also generating the ViewModel and applying credential validation through prompts.
Questions you may have
You may be wondering if Code Assistants truly add value to the development cycle. There is no doubt about that! The main reason being the gains in productivity in routine tasks that are currently done manually by devs.
So, will Code Assistants replace human software engineers? It is crucial to demystify the notion of “predatory AI”: even though smart assistants are doing code generation, it is still not yet 100% functional, as it will still depend on the context to which it is applied.
Therefore, it is and will always be the role of the software engineer to provide the correct inputs and complement the code to make it 100% functional. Before sending code to production, it is necessary to validate whether the generated implementation follows business requirements.
Now it’s time to put into practice what you’ve learned here, book a demo with our experts now.